Sod Installation Greensboro gives your yard an instant, lush appearance, but a quality lawn requires more than just sod. You also need to follow a regular watering schedule, especially during warmer months.
Start by dampening the area within 6 hours of sod delivery, especially during the summer. It roots faster in cool soil and needs to be watered regularly.
Before laying sod, the area should be clear of debris and weeds. This will ensure that the sod has a clean slate and will be less likely to compete with existing grass and weeds for nutrients and water. You can remove the old grass and weeds by hand or using a chemical herbicide. Once the area is free of existing vegetation, it should be tilled and prepared for sod installation. The soil needs to be tilled to break up clods and smooth out the surface. This allows sod to make better contact with the ground and reduces the likelihood of air pockets that hinder root growth. A rototiller works best, but if you do not have one, you can use a manual garden tiller or even a shovel.
After tilling, the soil should be leveled and graded to ensure that water drains properly. This will help prevent the sod from becoming waterlogged or pooling in low spots. It is also important to have a slight slope away from buildings and other structures for proper drainage. The soil should be about 1-2 inches lower than the grade of any paved surface, such as a driveway or sidewalk. It is also a good idea to add any necessary soil amendments at this time. This is a great opportunity to spread nutrient-rich compost, such as Soil3 organic compost (available in a BigYellowBag or at Ryno Lawn Care stores for pick up in Mini Cubes).
After adding the soil amendments, the area should be rototilled again. This will further break up clods and allow the amended soil to be worked in well. This is also a good time to add a starter fertilizer, such as 10-10-10 or 13-13-13, which will provide the sod with the nutrients it needs for successful establishment. Till the fertilizer into the soil thoroughly to ensure that it is available to the sod roots. It is recommended to fertilize new sod 4-6 weeks after it has been installed.
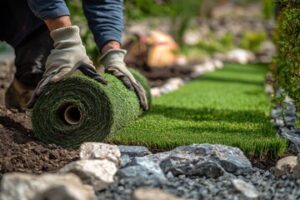
Cutting the Sod
While it may seem counterintuitive to cut up the sod that you just spent time and money laying, this step is essential for a long-lasting and healthy lawn. A sod cutter makes precise horizontal cuts just below the grass and root layer to make a clean and smooth surface for your new sod installation. Using a sod cutter speeds up the process and also prevents damage to existing turf.
When the sod is delivered, it’s a good idea to have a crew on hand to begin the laying process immediately. This way, you don’t lose any of the precious hours it takes for sod to take root and establish itself in the soil. It’s also important to have the sod delivered no later than 24 hours before you plan on installing it. This gives the sod time to sit and rehydrate after it’s been transported.
Begin the sod laying process along a straight edge, such as a sidewalk or fence, to keep the rows of sod straight and minimize cutting. If you are laying sod on a slope, start at the bottom of the hill and work your way up. You may need to anchor the sod in place with wood sod stakes on steep slopes.
As you lay the sod, butt pieces tightly together and remove any gaps that appear. These gaps will encourage weed growth and lead to unsightly brown stripes in your new lawn. It’s also a good idea to use a sod roller to eliminate air pockets and encourage contact with the soil underneath.
Sod that is not firmly rooted within two weeks can begin to die, leaving you with an unattractive lawn. To avoid this, water your sod immediately after laying it and water it daily (depending on rainfall) until it is rooted.
If you notice that your sod is turning yellow, it’s likely that the soil is not supplying enough nutrients or that the sod is getting too much sun. If you continue to have trouble, it’s a good idea to consult with a professional landscaping expert.
Laying the Sod
Sod installation is a fast way to get your yard looking great, but it’s important to lay the sod correctly. Here are some tips on doing it right:
Start with the Longest Straight Edge
The first row of sod should be laid along the longest straight edge of your lawn, which is typically a walkway or driveway. This helps with stability and ensures that your sod doesn’t get dried out or wash out from heavy traffic or rain. The first row should be butted tightly against the paved surface or curb to prevent any gaps in the first few weeks of establishment.
Work the Soil
Once you’ve prepared the soil, use a metal garden rake to smooth the area and distribute any bumps or piles of dirt. Soil that is a bit bumpy can cause problems with sod, as it can be difficult to root into the ground. If possible, try to lay sod during the spring or fall, as these seasons offer the best conditions for roots to firmly establish and grow.
Remove Air Pockets
The final step before laying sod is to go over the entire area with a lawn roller. This will press out any air pockets in the soil, making it easier for the sod to settle and become a permanent part of the landscape.
Avoid Gaps
Be sure to fill in any gaps between rows of sod with a trimmed sod piece. Otherwise, these gaps will widen over time and expose the edges of the sod or the soil, which can lead to root rot or grass death.
Stagger the Rows of Sod
When you’re laying the second and subsequent rows, stagger the sod pieces in a brick pattern. To do this, start the first row with a full sod piece, then cut a sod roll in half and lay it next to the full piece to begin staggering. Continue this pattern with the rest of the rows until you’ve filled in your whole yard.
When you’re laying sod in large areas, it can be helpful to lay a piece of plywood atop the sod for distribution of your weight. This will prevent the sod from becoming damaged or bruised by your foot or knee as you walk across it.
Watering the Sod
A key to successful sod installation is watering the lawn properly. This is especially important during the first month after installation, as sod needs to be hydrated in order to establish itself in the soil and thrive. However, overwatering can be just as harmful as not watering enough, so it’s essential to find a balance.
Watering new sod is easy, but it takes a little practice. Using a hose, spray the sod area lightly to moisten it. This helps to lower soil temperatures and reduces stress on the grass. It also helps to prevent muddiness and makes it easier to work on the project.
Immediately after laying sod, it’s crucial to water the lawn frequently and deeply. A hose or watering can with a nozzle set to a “sprinkler” setting will help ensure that the sod is thoroughly saturated. It may take up to 60 minutes for sod to be fully saturated, depending on the temperature and humidity of the day.
After the sod has taken root in the soil, it will be more resilient to drought. At this point, it’s helpful to pull back a corner of the sod and examine it. If it isn’t muddy, it means the roots are firmly anchored in the soil. It’s also a good idea to apply Scotts Turf Builder Starter Food for New Grass to help the sod establish faster and bond quickly with native soil.
As the sod grows and becomes more established, it’s best to move to less frequent but longer watering sessions. This encourages deep root growth and helps to prevent weeds and other unwanted plants from taking over. It is also recommended to stake sod on slopes in order to prevent it from shifting and becoming unsightly.
While sod can be installed throughout the year, it is best to do so during the spring or fall in order to provide optimal conditions for establishing roots. Sod can also be used to repair damaged areas of existing lawns, as well as to create new lawns where bare spots exist. Sod can be mowed once it is fully rooted, typically about two weeks after installation.